
After logging into Campaign Manager you will be brought to the Campaign Dashboard. If you have access to more than one account, confirm you are on the account you want by checking the dropdown menu at the top of the screen.
The Campaign Dashboard displays all campaigns for an account as well as allows you to create campaigns, edit campaigns, duplicate campaigns and view template versions.

To edit a campaign, select the pencil icon next to the campaign name you wish to edit. This will take you to the Campaign Settings tab of the selected campaign. Once on this tab, you can also access the Manage Snapshots, Publishing Info, and Analytics tabs.
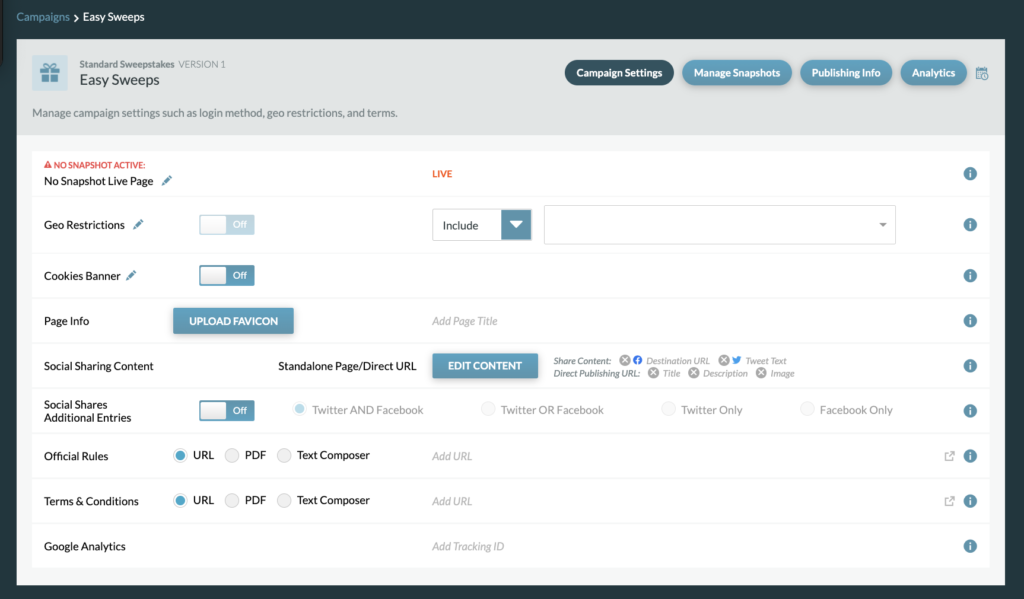
On the Campaign Settings tab, you can:
- Edit the No Snapshot Live Page
- Edit the Geo Restrictions Page & Update Restrictions
- Cookies Banner
- Edit Page Info
- Edit Social Sharing Content
- Social Shares Additional Entries
- Add Official Rules and Terms & Conditions
- Add Google Analytics
No Snapshot Live Page
If there is no snapshot active for your campaign, the URL will show an Error Page. You can make the Error Page for each campaign unique by adding an image or video, writing a special message, and/or adding up to three text links. You can access the Error Editor Page by clicking the pencil icon.
Geo Restrictions Page
Each campaign will have its own Geo Restrictions page in which a user will see if they are out of geo. You can make the Geo Restrictions Page unique for each campaign by adding an image or video, writing a special message, and/or adding up to three text links. You can access the Geo Restriction Page by clicking the pencil icon.
Update Geo Restrictions: You can choose to include or exclude specific countries. Turn the geo limits on by adding countries to the form field and choosing the drop down ‘include’ or exclude.” To turn the geo restrictions off, simply remove all countries from the field.
Cookie Banner
If utilizing Google Analytics while the supported geo is worldwide or a European country, the Cookies Banner needs to be enabled. Clicking the pencil icon will allow you to edit it.
Page Info
In the Page Info section you can upload a Favicon (Favicon must be a PNG file – 32x32px) and update the Page Tab Title. The Page Tab Title for the web page is displayed at the top of the browser next to the favicon.

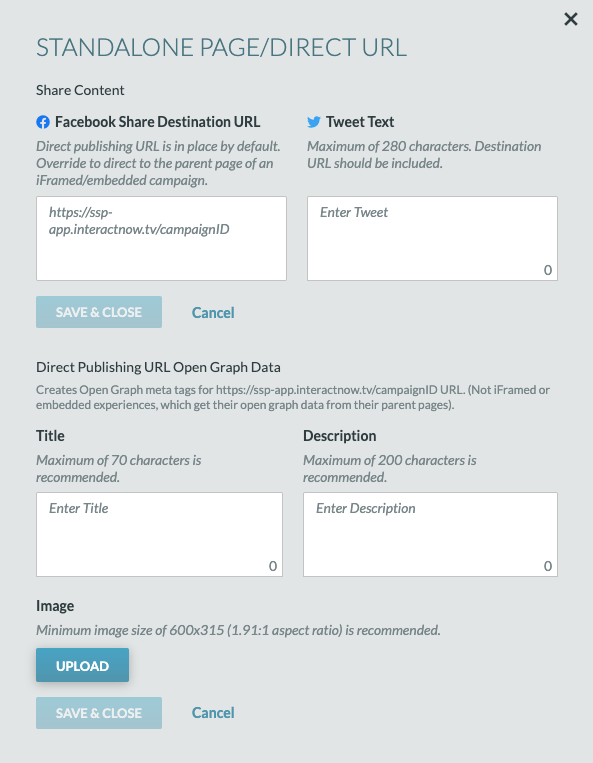
Social Sharing Content
This is where the sharing info for the campaign is set, using open graph tags on the page. Click “Edit Content” to add the FB Share Destination URL (CM autogenerates the CM URL), a generic tweet, as well as a title, description, and image to the metadata.
Official Rules and Terms & Conditions
For the Official Rules and Terms & Conditions, a URL can be entered, a PDF can be uploaded, or text can be entered into the CM editor. If uploading or using the editor, a URL will be generated to access the information.
Note: If adding text to the CM editor, remember that a NEW link will be generated each time there is a change.
Social Shares Additional Entries
Allow users to get an extra sweeps entry for sharing the sweeps on social media.
Google Analytics
To track your campaign analytics, create a Google Analytics ID and enter the ID into the provided field.